Updated February 2026 | By Lily Clark
Affiliate Disclosure: This article contains affiliate links. If you purchase through them, I may earn a small commission at no extra cost to you. I only recommend cookware I personally test and cook with in my kitchen
Most people think stir-fry success depends on temperature.
It doesn’t.
It depends on temperature geography.
If your electric wok produces beautiful browning at the center but limp vegetables along the walls, you don’t have a heat problem.
You have a map problem.
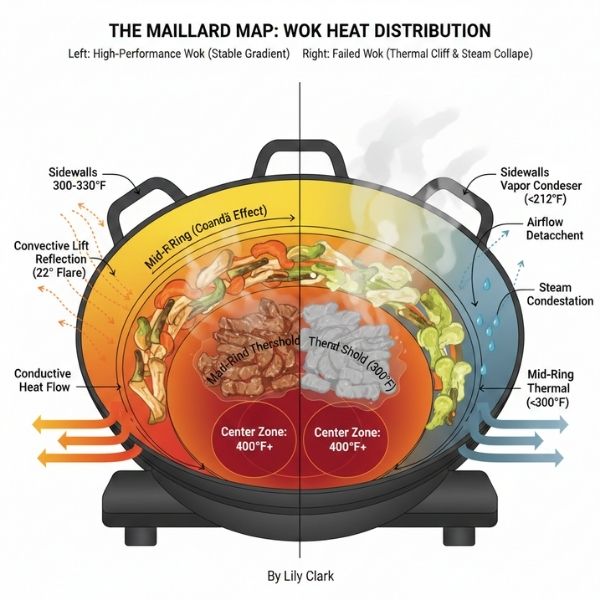
I call it the Maillard Map — the heat distribution pattern that determines where Maillard browning actually activates from the center of the base to the sidewalls.
Before we dissect it, zoom out.
If you’re still choosing between electric wok systems, start with the Best Electric Woks Reviews & Buying Guide. That guide explains base construction, sensor control, and geometry so this conversation makes sense inside the larger system.
Now let’s track the map.
What Temperature Actually Activates Maillard?
Maillard activation begins roughly between 285–300°F (140–150°C) depending on food chemistry.
- Sugars brown earlier.
- Proteins require slightly higher surface energy.
- Moisture delays activation.
For practical diagnostics, I use 300°F (~150°C) as the operational threshold.
Below that, browning slows dramatically.
Below that, walls become steam condensers.
That distinction matters.
The Map Is the Strategy
In a cheap electric wok, heat is a puddle.
It stays at the center and refuses to move.
In a high-performance wok, heat forms a controlled thermal gradient.
Example of a healthy Maillard Map:
- Center: ~420°F (215°C)
- Mid-ring: ~360–380°F (182–193°C)
- Upper wall: ~300–330°F (150–165°C)
That smooth decline allows:
- Ingredient staging
- Moisture evaporation
- Continuous browning
Cheap systems create cliffs:
- Center: 420°F
- 1 inch out: 325°F
- 2 inches out: 275°F
That is not a gradient.
That is failure.
Conductive vs. Convective Heat (The Forensic Split)
Heat does not simply “move outward.”
It travels through two different mechanisms:
Solid Conduction (Through Metal)
Heat flows from the center into the surrounding base material.
This depends on:
- Material conductivity
- Thickness
- Contact integrity with the heating element
Fluid Convection (Air + Oil)
Heat also rides upward through:
- Oil films
- Steam currents
- Rising air along the sidewalls
Here is where geometry matters.
A proper flare angle encourages rising hot air to cling to the wall surface due to the Coandă effect (the tendency of fluid flow to follow curved surfaces).
When the curve is correct, hot air doesn’t detach — it hugs the wall, keeping it active.
When the curve is wrong, air detaches early and heat dissipates.
Why 22° Works
The 22° flare angle is not mystical.
It balances two forces:
Convective Continuity
At roughly 20–23°, airflow remains attached to the surface because of the Coandă effect.
Too steep → airflow detaches.
Too shallow → steam stagnates.
Radiant Geometry
Infrared radiation travels in straight lines.
A steeper flare radiates heat outward and upward, away from food.
A ~22° flare directs more infrared energy back toward the cooking surface.
In practical terms:
- Steep wall = heat escapes
- 22° wall = radiant energy reflects inward
This keeps mid-ring temperatures from collapsing.
For a deeper geometry breakdown, see
Physics of Wok Geometry: Why 22° is the Thermal Sweet Spot
The Center: Engine, Not Territory
The center reaches the highest energy density.
This is where searing begins.
But if heat cannot migrate outward through conduction and convection, your stir-fry becomes overcrowded in a tiny thermal island.
For deeper energy concentration logic, see
Wattage Density & Heat Flux: Why 1500W Isn’t Enough for Searing
Raw wattage does not guarantee gradient integrity.
The Sidewalls: Cooking Surface or Vapor Condenser?
Here’s the brutal truth.
If your sidewalls drop below ~300°F (~150°C), they stop cooking.
They become vapor condensers.
Steam rising from protein hits cooler walls and collapses back into liquid.
This “Steam Collapse” is what makes stir-fry soggy even when the center is screaming hot.
It’s not your technique.
It’s your map.
Thermal Mass: Carbon Steel vs Cast Aluminum
Material determines how long the map survives stress.
Carbon Steel
- Lower thermal mass
- Faster response
- Sharper gradients
- Quick recovery
Cast Aluminum
- Higher thermal mass
- Slower collapse under load
- Smoother gradient
- Greater stability
But here’s the advanced nuance:
Emissivity
Emissivity describes how efficiently a surface radiates heat into nearby food without direct contact.
- Seasoned carbon steel has moderate emissivity.
- Darker aluminum coatings can radiate more efficiently.
- Polished stainless has lower emissivity.
Higher emissivity improves non-contact heat contribution, especially along sidewalls.
Thermal mass governs storage.
Emissivity governs radiation.
Both influence the Maillard Map.
Interface Resistance: The Hidden Map Killer
The Maillard Map is not permanent.
As thin bases heat cycle repeatedly, they warp.
Warping reduces the Contact Patch between the base and heating element.
This introduces Interface Resistance.
Instead of smooth conduction, you get:
- Thermal islands
- Dead zones
- Patchwork browning
The Forensic Diagnostic
I place a straightedge across the base after 100 cycles.
If light passes underneath, the map is compromised.
Food browning unevenly on opposite sides is not a skill failure.
It is mechanical interface failure.
Sensor Stability & Map Integrity
Even perfect geometry collapses under poor control logic.
Cheap probe systems with wide hysteresis create temperature swings:
- 420°F spike
- 320°F crash
- Reheat surge
This fractures the gradient repeatedly.
For the full breakdown, see
Probe vs. Integrated Sensors: Why Cheap Electric Woks ‘Cycle’
Recovery slope — the speed at which temperature rebounds after food is added — determines whether the map holds or shatters.
The Multi-Purpose Pot Illusion
Flat-bottom multi-cookers distribute heat widely but shallowly.
They lack:
- Defined mid-ring intensity
- Active sidewall heat
- Vertical gradient architecture
See
Multi-Purpose Electric Pots vs. Traditional Woks
Flat heat is not stir-fry heat.
A wok must have terrain.
Cheap Wok:
- Heat puddle at center
- Walls below Maillard threshold
- Cliff gradient
- Warped base over time
- Steam collapse
High-Performance Wok:
- Conductive continuity
- Convective airflow attachment
- Radiant reinforcement
- Stable contact patch
- Sidewalls maintained above ~300°F (150°C)
That’s the difference between browning and boiling.
What is the Maillard Map?
The Maillard Map is the heat distribution pattern in a wok that determines where browning temperatures are sustained.
Why is 300°F important?
Because Maillard activation begins around 285–300°F (140–150°C). Below that, browning slows and condensation dominates.
What fractures the map?
Warped bases, poor conduction, sensor cycling, weak geometry, and steam collapse.
Conclusion
A stir-fry system is not defined by peak heat.
It is defined by gradient integrity.
If heat stays pooled, you don’t have a wok.
If walls condense steam, you don’t have browning.
If the base warps and forms thermal islands, your map is fractured.
The Maillard Map is the true diagnostic.
And once you understand it, every wok reveals itself.
Legal Information
Shopbirdy.com is a participant in the Amazon Services LLC Associates Program, an affiliate advertising program designed to provide a means for sites to earn advertising fees by advertising and linking to Amazon.

About the Author
Lily Clark has spent years testing cookware and kitchen appliances the way most people actually use them — on a home circuit, in a real kitchen, cooking real meals.
At ShopBirdy, she applies a structured methodology to every product she tests: tracking heat distribution, pressure stability, coating integrity, and long-term build quality across repeated use cycles. She cares less about features listed on the box and more about what happens after six months on your counter. Her reviews are written for people who want to buy once and cook well.