Affiliate Disclosure: This article contains affiliate links. If you purchase through them, I may earn a small commission at no extra cost to you. I only recommend cookware I personally test and cook with in my kitchen.
Updated January 2026 | By Lily Clark
Burnt bottoms. Snotty whites. Yolks that go from raw to chalky in ten seconds flat. These aren’t accidents, and they aren’t bad luck.
They are predictable heat errors.
A truly great fried egg—crisp, lacy edges with a warm, runny yolk—isn’t the result of gentle cooking. It’s controlled aggression. You need enough heat to build structure fast, then enough discipline to pull back before you do damage.
Once you understand where that line lives, breakfast stops being a gamble.
What “Perfect” Actually Means
Before technique, define the target. A perfect fried egg delivers contrast, not compromise.
- Crisp, golden edges for flavor and texture
- Fully set whites with no translucent film
- A warm, runny yolk that spills, not stiffens
- No bitterness, which means heat stayed under control
This is not a low-heat egg.
It’s a fast start, smart finish egg.
This is not a low-heat egg. It’s a fast-start, smart-finish egg. (If you want low and slow, see our guide on the Best Temperature for Scrambled Eggs
The Heat Myth That Ruins Fried Eggs
Most people hear “crispy edges” and leave the burner on high from start to finish. That’s how you scorch the bottom while the yolk barely warms.
Here’s the rule that actually matters:
High heat is required—but only briefly.
Heat builds structure. Time destroys it. Stay aggressive too long and the whites burn before the yolk is ready. Start too gently and the egg spreads, steams, and turns rubbery.
A perfect fried egg technique depends on timing the pullback, not avoiding heat.
The Pan Rule: Choose Your Weapon
Pans behave differently under aggression. If you use the wrong tool, you’re fighting the laws of thermodynamics.
Carbon Steel (The King)
Why it wins: high thermal conductivity with instant cooling. Carbon steel builds aggressive, lacy edges quickly, then sheds heat the moment you turn the dial down.
Because it’s thinner than cast iron, it doesn’t keep blasting energy into the egg after the pullback. In fried eggs, speed is life—and carbon steel gives you control at speed. That’s why professional short-order cooks rely on it.
Stainless Steel (The Specialist)
What it does well: excellent heat transfer and beautiful browning.
The cost: zero forgiveness. If your oil isn’t shimmering when the egg hits the pan, proteins bond instantly and you’ll leave half the egg behind. Stainless rewards precision and punishes hesitation.
Cast Iron (The Problem Child)
Too much thermal mass. It’s a freight train—hard to start, harder to stop. Even after you lower the heat, the pan continues pushing energy into the egg, tightening the whites and overcooking the yolk while you’re trying to recover.
Nonstick (The Safety Net)
You’ll get a clean release every time, but you’ll never achieve true shattered-glass crispness on the edges. Use it to learn timing, but understand its ceiling.
If you prefer this route, check our lab results on the Best Nonstick Pans for Eggs.
The Anatomy of a Perfect Edge (Why Crisp Matters)
Those brown, lacy edges aren’t cosmetic—they’re chemistry.
When proteins and sugars hit high heat, they undergo the Maillard reaction, the same process that browns steak and toast. In a fried egg, that crisp “skirt” delivers concentrated savory depth that balances the richness of the yolk.
If your egg is pure white from edge to center, you’re missing half the flavor profile. Crisp edges aren’t burning. They’re intention.
Egg Anatomy: Why Some Whites Stay “Snotty”
An egg has two whites:
- A thick white near the yolk that sets cleanly
- A thin white around the outside that spreads easily
As eggs age, the thin white becomes looser. This is why older eggs puddle, develop ragged edges, and stay translucent long after the yolk is ready.
The Freshness Fix (Restaurant Trick)
For a tighter, cleaner egg:
- Crack the egg into a fine mesh strainer
- Let the watery whites drain for a few seconds
- Slide the remaining egg into the pan
Safety & technique note:
Use a metal or silicone strainer, not plastic. Be gentle—shaking or pressing can rupture the yolk before it ever reaches the pan.
This trick produces a compact egg with faster-setting whites and better edge structure—no gimmicks, just anatomy.
Fat Choice: Why Oil Wins the Edge War
Fat determines how aggressively the edges cook.
- Neutral oil: higher smoke point, cleaner crunch, better lace
- Butter: great flavor, but burns before crisping finishes
Best practice: start with oil to handle the heat. Add butter after the pullback if you want flavor without scorch.
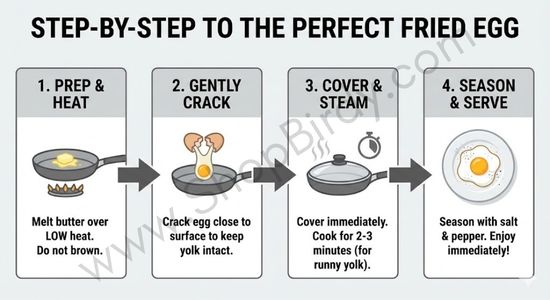
Perfect Fried Egg Technique (Look → Act Logic)
1. Preheat With Intent
Heat the pan on medium-high. Add oil and wait for shimmering oil—if it looks lazy, your edges will be rubber.
This is the structural phase.
2. Commit to the Crack
Crack the egg close to the pan. You want an immediate, controlled sizzle.
That sound is the edge locking in before the whites spread.
3. The Critical Pullback (Controlled Aggression Lives Here)
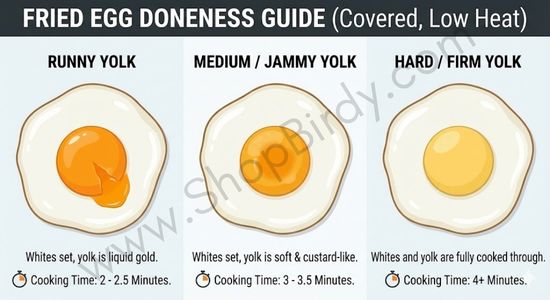
Look for: the outer whites turning opaque (about 20–30 seconds).
Then: drop the heat to medium or medium-low.
This is the controlled part of controlled aggression.
You’ve built the house (edges); now you’re furnishing the interior (yolk).
Miss this moment, and no fix will save the egg.
🔥 Pro Tip: Basting (Maximum Control)
Tilt the pan and spoon hot fat over the whites—never the yolk.
Basting cooks the top of the whites without flipping, preserves a runny yolk, and removes guesswork. Flipping is a gamble. Basting is control.
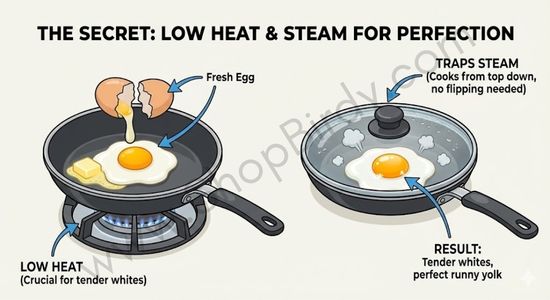
Cheat Code: The Lid Method (Know the Trade-Off)
If hot oil feels messy:
- Add 1 teaspoon of water to the edge of the pan
- Cover for 20–30 seconds
The steam sets the top of the whites without cooking the yolk through.
Trade-off: steam softens the edges slightly. You gain reliability and safety, but sacrifice maximum crispness. It’s a valid choice—not a failure.
Pull Early: Understanding Carryover Heat
Eggs don’t stop cooking when they leave the pan.
Heat transfers from pan to plate, then back into the egg. If you plate too late, carryover heat tightens the whites and thickens the yolk. If the plate is ice-cold, the egg loses structure instantly.
Best practice: warm the plate. Pull the egg while the yolk still jiggles. Let physics finish the job.
Test Results (What Actually Worked)
Across repeated tests on gas and electric burners:
- Carbon steel + oil + pullback at opacity produced the cleanest lace and the most consistent runny yolks.
- Cast iron required earlier pullback and still overcooked yolks 3 out of 5 times due to retained heat.
- Basting vs flipping: basting preserved yolk integrity in 100% of tests; flipping cracked yolks in nearly half.
- Strained eggs set faster, spread less, and browned more evenly than unstrained eggs of the same age.
Conclusion: technique matters more than pan—but the right pan amplifies good decisions.
Seasoning Strategy (The Pro Detail)
Salt placement matters.
- Salt the whites early to help them set
- Avoid salting the yolk early (can cause pale spotting)
- Finish with light salt and pepper once plated
This keeps the yolk glossy and the whites tight.
Troubleshooting Your Perfect Fried Egg Technique
Burnt edges, raw whites
→ Stayed on high too long. Pull back sooner.
Rubbery whites
→ Started too cold. You steamed the egg.
Hard yolk
→ Pulled too late. Trust carryover heat.
Sticking
→ Pan wasn’t hot before the egg went in.
If your nonstick is failing you, learn How to Clean Sticky Residue to restore it.
Final Take: Fried Eggs Reward Control
Scrambled eggs teach patience.
French omelets teach restraint.
Fried eggs teach decisive heat management.
Use this checklist:
- Start hot to build lace
- Watch the whites, not the clock
- Pull back early
- Baste or steam—don’t flip blindly
- Remove while the yolk still jiggles
- Let carryover heat finish the job
Perfect fried eggs aren’t luck.
They’re managed aggression, applied deliberately and stopped on time.
Serving Suggestion (Finish the Experience)
This egg belongs on buttered sourdough, where the yolk can soak into the crumb, or dropped onto spicy ramen, where crisp edges cut the richness of the broth. It also elevates avocado toast from filler to meal.
Now that you’ve mastered the fried egg, are you ready for the ultimate test? Check out How to Make a French Omelet.
Legal Information
Shopbirdy.com is a participant in the Amazon Services LLC Associates Program, an affiliate advertising program designed to provide a means for sites to earn advertising fees by advertising and linking to Amazon.
About the Author

Lily Clark has spent years testing cookware and kitchen appliances the way most people actually use them — on a home circuit, in a real kitchen, cooking real meals.
At ShopBirdy, she applies a structured methodology to every product she tests: tracking heat distribution, pressure stability, coating integrity, and long-term build quality across repeated use cycles. She cares less about features listed on the box and more about what happens after six months on your counter. Her reviews are written for people who want to buy once and cook well.