Affiliate Disclosure: This article contains affiliate links. If you purchase through them, I may earn a small commission at no extra cost to you. I only recommend cookware I personally test and cook with in my kitchen.
Updated December 2025 | By Lily Clark
The French omelet isn’t difficult because it’s fancy.
It’s difficult because it’s unforgiving.
There’s no browning to hide mistakes. No fillings to distract. No high heat to force success. A proper French omelet is pale, tender, just-set, and rolled with intention.
And despite the mystique, it comes down to three things:
Heat discipline. Pan control. Timing.
Once those are locked in, the roll stops feeling mysterious—and starts feeling mechanical.
French Omelet vs. American Omelet
Many people think they’re making a French omelet—but their technique is American-style from the first second. Here’s the difference that matters:
Feature | French Omelet | American Omelet |
Surface | Smooth, pale, buttery | Matted, browned, textured |
Interior | Custard-like (baveuse) | Fully set, fluffy, airy |
Shape | Torpedo-shaped, rolled | Half-moon, folded |
Heat | Medium-low (constant) | Medium (often high to start) |
If your eggs are fluffy, airy, or browned—even slightly—you’re no longer in French omelet territory.
The Heat Rule That Controls Everything
A French omelet lives in what I call the quiet zone.
- Low to medium-low heat
- No sizzling
- Butter melts silently
- Eggs set gently, not instantly
If you’re struggling to find this zone on your stove, my guide on the best temperature for scrambled eggs breaks down the physics of medium-low heat in detail. The principle is identical—the margin for error is just smaller here.
Air Is the Enemy (The Science Most Guides Skip)
A French omelet fails before it ever hits the pan if you incorporate too much air.
Air expands as eggs cook. Expansion creates internal pressure. Pressure cracks the exterior during the roll.
Pro Tip (Critical):
When whisking, use:
- A fork or flat whisk
- A side-to-side motion, not circular whipping
Your goal is protein denaturation, not foam.
You want:
- Uniform color
- No bubbles
- No froth
Air equals fluff. Fluff breaks the roll.
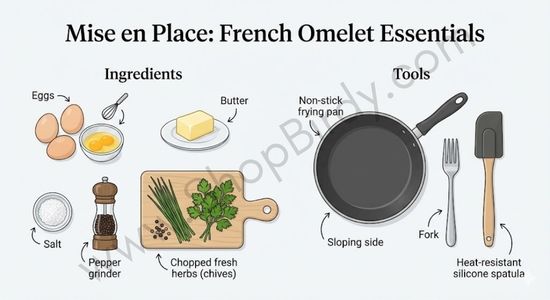
Pan Choice: Where Forgiveness Actually Matters
This technique demands even heat and clean release.
Best characteristics:
- 8–9 inch nonstick pan
- Smooth, intact coating
- Moderate thermal mass (not heavy cast iron)
Thin pans create hot spots. Heavy pans retain too much heat and overcook the eggs while you’re rolling.
For this technique, a pan with roughly a 22-degree flare is the sweet spot for sliding the omelet onto the plate. See which pans passed my geometry audit in the best nonstick pan for eggs guide.
Step-by-Step: How to Make a French Omelet (The ShopBirdy Method)
1. Beat the Eggs (Gently)
Use 2–3 eggs. Beat just until combined—no foam, no air.
2. Preheat Quietly
Set heat to low or medium-low.
Warm the pan for ~30 seconds.
Add butter. It should melt smoothly without browning.
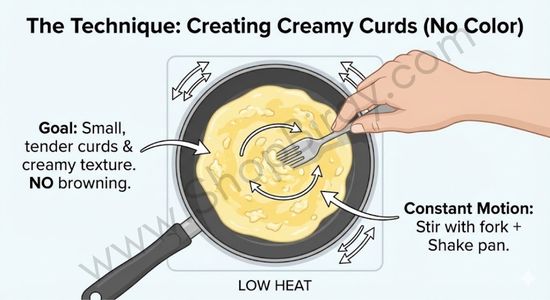
3. Pour, Shake, Stir
Add eggs and immediately:
- Shake the pan gently
- Stir with a soft spatula
This creates a fine, custardy base instead of curds.
4. Stop Stirring Early
When eggs are:
- Mostly set
- Slightly glossy on top
- Moving as a single sheet
Stop touching them.
This is where most omelets are ruined—by one stir too many.
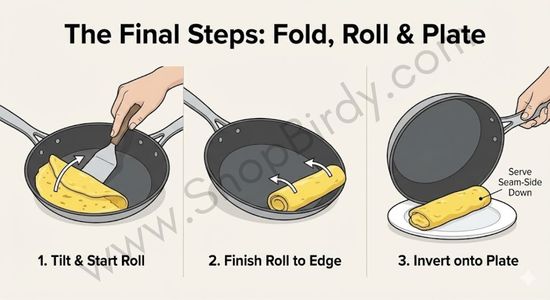
Think of the roll as guiding gravity, not folding eggs.
- Tilt the pan slightly away
- Lift the far edge
- Roll in small, controlled movements
- Let the omelet move itself
If you have to force it, something earlier went wrong.
5. Seal and Slide
- Turn off the heat
- Let residual warmth set the seam
- Slide onto a plate seam-side down
A perfect French omelet relaxes slightly—it doesn’t deflate.
French Omelet Troubleshooting (Save This)
The Problem | The Diagnosis | The Lily Fix |
Mottled brown skin | Initial heat too high | Shorten preheat; test pan with a drop of water |
“Tearing” at the fold | Overcooked or too much air | Pull from heat while the top is still glossy |
Gray/green tint inside | Overcooked (sulfur reaction) | Immediate removal; use a cooler pan |
Sticking during the roll | Poor coating or wet base | Use your best nonstick pan; ensure butter fully coats |
This table alone solves most failures.
Final Take: How to Make a French Omelet Reliably
- Medium-low, steady heat
- Minimal air in the eggs
- Stir early, never late
- Stop cooking sooner than feels logical
- Roll with gravity, not force
The French omelet isn’t about showing off.
It’s about restraint.
Mastered the roll? Now see why eggs in a cast iron skillet are the ultimate final boss for home cooks.
Legal Information
Shopbirdy.com is a participant in the Amazon Services LLC Associates Program, an affiliate advertising program designed to provide a means for sites to earn advertising fees by advertising and linking to Amazon.

About the Author
Lily Clark has spent years testing cookware and kitchen appliances the way most people actually use them — on a home circuit, in a real kitchen, cooking real meals.
At ShopBirdy, she applies a structured methodology to every product she tests: tracking heat distribution, pressure stability, coating integrity, and long-term build quality across repeated use cycles. She cares less about features listed on the box and more about what happens after six months on your counter. Her reviews are written for people who want to buy once and cook well.