UpdatedJanuary 2026 | By Lily Clark
Affiliate Disclosure: This article contains affiliate links. If you purchase through them, I may earn a small commission at no extra cost to you. I only recommend cookware I personally test and cook with in my kitchen.
When a pressure cooker lid won’t open, the cooker isn’t malfunctioning—it’s responding to physics and material behavior.
Your goal isn’t to overpower the lid.
Your goal is to identify which system is still active—pressure, vacuum, or mechanical friction—and neutralize that force safely.
If you’re shopping for a new unit, several models in our Best Multi-Cookers and Pressure Cookers guide include automatic steam release, which actively reduces post-cook vacuum lock—one of the most common causes of stuck lids.
First Rule: Never Fight the Lid
A stuck lid is a safety outcome, not a defect.
Modern multi-cookers rely on:
- A float valve (pressure signal)
- A spring-loaded locking pin
- A silicone gasket that manages pressure and vacuum
If the lid won’t open, one of those systems is still engaged.
Lily’s Float Valve Diagnostic (Your Decision Point)
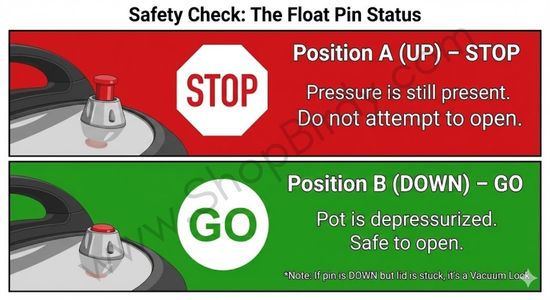
Before touching anything, check the float valve.
Float Valve Diagnostic Box
Float Valve Position | What It Means | What’s Holding the Lid |
UP | Pressure or pressure signal still present | Heat + vapor generation |
DOWN | No pressure | Vacuum lock or mechanical adhesion |
Why this matters:
When the float valve is up, a mechanical pin physically blocks lid rotation.
If it’s down, pressure is no longer the issue—you’re dealing with air pressure or material friction.
Reason #1: Residual Pressure (Float Valve Still Up)
If the float valve is still up, waiting isn’t about time—it’s about thermal inertia.
Dense foods (beans, stews, curries) retain heat long after cooking stops. Even when visible steam is gone, the food mass may still be hot enough to actively generate vapor, keeping the valve engaged.
Safe Diagnostic (Important Correction)
- Listen for boiling sounds from a safe distance (about 12–18 inches)
- Do not place your face, ear, or hands near the lid rim while the float valve is up
If you can still hear bubbling, internal vaporization is still occurring.
You are not waiting for minutes to pass.
You are waiting for the reversal of the phase change—moving from active vaporization back to total condensation. Once vapor collapses into liquid, internal pressure drops and the float valve follows.
What to Do
- Leave the cooker untouched
- Do not attempt to twist the lid
- The valve will drop only after vapor generation stops
If the float valve is up, the lid is correctly locked.
Reason #2: Vacuum Lock (Float Valve Down, Lid Still Stuck)
This is the most common cause of a stuck lid after pressure is gone.
Why the Suction Is So Strong
When steam cools and condenses into water, it occupies 1,600 times less space.
That collapse creates a partial vacuum.
Atmospheric pressure now pushes the lid downward with hundreds of pounds of force.
You aren’t fighting the lid.
You’re fighting the weight of the air in the room.
Safe Fix (Structural Guardrail)
⚠️ Never pour water directly onto the lid of an electric multi-cooker.
Water can seep into the control panel or heating housing.
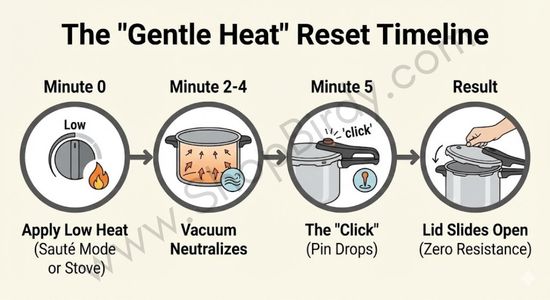
Correct Method
- Use a hot, damp cloth
- Press it firmly against the lid rim
- Hold for 30–60 seconds
This gently warms the trapped air inside the pot, increasing its volume and equalizing pressure—without endangering electronics.
Listen for a faint click or air release.

⚠️ Safety Note: If your pot was filled near the “Max” line, use the Sauté method with caution. As the vacuum breaks, the sudden influx of air can cause hot liquids to surge.
Ensure the steam release valve is in the “Venting” position before heating to provide an escape path for the equalizing air.
Reason #3: Gasket Adhesion (Chemical Degradation)
If the float valve is down, vacuum has been addressed, and the lid still resists, the gasket is likely involved.
Over time, silicone can undergo chemical reversion:
- Elastic rebound weakens
- The surface becomes slightly gummy
- The gasket adheres to metal surfaces
A stuck lid here is an early warning—not a coincidence.
A gummy or sticking lid is a sign of silicone reversion.
See When to Replace Your Pressure Cooker Gasket for confirmation and replacement guidance.
What to Do
- Let the cooker cool completely
- Press gently around the lid perimeter (never pry)
- Once open, inspect the gasket immediately
If it feels sticky, glossy, or slow to rebound, replace it before the next cook.
Reason #4: Starch in the Locking Channel (Mechanical Interference)
This isn’t just “dirt.”
When starch dries, it becomes a high-friction adhesive.
Inside the lid:
- The locking pin is spring-loaded
- It relies on low friction to retract
If dried starch creates more resistance than the spring can overcome, the pin stays engaged—even with zero pressure.
The Correct Fix
This is not just cleaning—it’s re-hydrating the starch.
- Allow the cooker to cool fully
- Apply gentle moisture to the locking area
- Let the residue soften so the spring can retract the pin
Once open, clean thoroughly.
If buildup persists, follow How to Deep Clean Sealing Rings—starch residue also accelerates odor saturation.
Reason #5: Lid Misalignment (Differential Thermal Expansion)
If the lid was slightly misaligned before cooking, pressure cycling can wedge it in place.
Why this happens:
- Stainless steel inner pots expand more than surrounding lid components
- Plastic and metal housings expand at different rates
- If misaligned at the start, expansion forces the metal into the locking tabs
As the cooker cools, contraction releases that wedge.
What to Do
- Apply gentle downward pressure
- Rotate slightly backward, then forward
- Stop at the first resistance
If misalignment is the issue, the lid releases smoothly as materials contract.
Post-Open Recovery Step (Do This Immediately)
Once the lid opens—don’t walk away yet.
After vacuum lock, starch adhesion, or gasket stick:
- Wipe the gasket and rim with a dry cloth immediately
- Remove any moisture or residue
Letting starch or condensation “air dry” sets the trap for the next stuck lid.
This one step prevents repeat failures.
What You Should Never Do
If your pressure cooker lid won’t open, never:
- Pry with utensils
- Strike the lid
- Twist aggressively
- Disassemble while sealed
Every serious lid-related failure begins with force.
When a Stuck Lid Means “Replace a Part”
The lid itself almost never fails.
Repeated sticking usually points to:
- Gasket degradation
- Recurrent vacuum lock cycles
- Starch interfering with the locking pin
If the float valve is down and the issue repeats, replace the gasket first.
It’s inexpensive—and it protects the entire system.
The Rule I Use
If my pressure cooker lid won’t open and the float valve is already down—
I stop troubleshooting and inspect the gasket.
Because at that point, pressure is no longer the problem.
Bottom Line
If your pressure cooker lid won’t open, you’re dealing with:
- Thermal inertia
- Atmospheric pressure differential
- Or mechanical friction
Identify which system is active, solve that physics problem, and the lid will open—without force and without damage.
Legal Information
Shopbirdy.com is a participant in the Amazon Services LLC Associates Program, an affiliate advertising program designed to provide a means for sites to earn advertising fees by advertising and linking to Amazon.
About the Author

Lily Clark has spent years testing cookware and kitchen appliances the way most people actually use them — on a home circuit, in a real kitchen, cooking real meals.
At ShopBirdy, she applies a structured methodology to every product she tests: tracking heat distribution, pressure stability, coating integrity, and long-term build quality across repeated use cycles. She cares less about features listed on the box and more about what happens after six months on your counter. Her reviews are written for people who want to buy once and cook well.