When Should You Replace Your Pressure Cooker Gasket?
Updated January 2026 | By Lily Clark
Affiliate Disclosure: This article contains affiliate links. If you purchase through them, I may earn a small commission at no extra cost to you. I only recommend cookware I personally test and cook with in my kitchen.
A pressure cooker doesn’t suddenly fail. It softens, slips, and quietly loses accuracy—usually at the gasket.
If you want reliable pressure, consistent cook times, and a cooker that ages well, this is one maintenance decision you can’t guess on.
Let’s make it objective.
If you’re comparing cookers right now, note that some of the models in our Best Multi-Cookers and Pressure Cookersguide include a spare gasket in the box—a small but meaningful sign that the manufacturer understands gasket lifespan and system wear.
What a Pressure Cooker Gasket Actually Does
The gasket (sealing ring) is made from silicone elastomer. Its job isn’t just sealing—it must compress, rebound, and maintain elasticity under heat and pressure.
Pressure cooking only works when the gasket can:
Compress evenly
Snap back instantly
Maintain shape through repeated heat cycles
Once that rebound energy fades, pressure cooking becomes unreliable—even if the gasket looks fine.
The Real Failure Mechanism: Elastomer Fatigue (Thermal Set)
Silicone gaskets don’t fail because they’re “old.” They fail because of thermal set.
Every time you cook:
Heat causes the gasket to expand
Cooling forces it to contract
Over hundreds of cycles, the polymer chains stop fully returning to their original shape. This loss of elastic memory is called elastomer fatigue.
👉 That’s why a gasket can look intact but fail to seal. It physically can’t push back into the rim with enough force anymore.
The 3-Second Snap Test (Do This Now)
Here’s a simple diagnostic you can perform in under a minute.
The 3-Second Snap Test
Stretch a 3-inch section of the gasket to about 5 inches
Release it completely
Watch what happens
Replace the gasket if:
It takes longer than 1 second to return to shape
It returns but stays slightly wavy or oval
That delay means the polymer has reached thermal set. The gasket no longer has the rebound energy required to seal under pressure.
This test is more reliable than visual inspection.
This visual provides a clear, side-by-side comparison of what a healthy, elastic gasket looks like when stretched versus a worn-out one that has lost its tension. This gives simple, reliable test which you can perform at home.
When to Replace a Pressure Cooker Gasket (Real-World Timeline)
Ignore calendar advice. Count heat cycles.
Daily use (rice, lentils, beans): replace every 6–9 months
3–4 uses per week: replace every 9–12 months
Occasional use: up to 18 months, with proper storage
Heavy starches and long pressure holds accelerate fatigue.
7 Signs You Should Replace Your Pressure Cooker Gasket
Any one of these means the gasket is already past peak performance.
1. Steam Leaking from the Lid Rim
Steam escaping from the edge of the lid points to gasket failure.
If deep cleaning doesn’t work, replacement is the fix.
4. Flattened, Glossy, or Rigid Sections
A healthy gasket feels springy and matte.
Glossy or flattened areas indicate permanent deformation—not surface wear.
5. Lid Feels Too Easy to Close
This is counterintuitive but important.
If the lid suddenly locks with little resistance, the gasket has lost thickness and compression force.
Good seals push back.
6. Random Steam Release During Cooking
This means the gasket can’t hold pressure evenly, forcing safety systems to compensate.
That’s not normal operation—it’s a warning.
7. The Lid Won’t Open After Pressure Drops (Vacuum Failure)
A degraded gasket can become gummy, causing it to stick to the lid or rim even after pressure equalizes.
This indicates chemical reversion of the silicone.
➡️ Replace the gasket immediately.
This timeline shows the physical changes a gasket undergoes over time—from a clear, flexible new ring to a discolored, brittle, and cracked failed one—making it easy to identify the state of gasket.
The Dual-Ring Strategy: Why Rotating Gaskets Works
Rotating two gaskets isn’t just about odor control—it’s about system life.
Silicone polymer chains benefit from rest periods. Longer time fully contracted between heat cycles reduces thermal set.
In practice:
Rotating two gaskets can increase each gasket’s active cooking hours by 20–30%
Pressure stability remains higher for longer
Replacement becomes predictable instead of reactive
This is one of the simplest ways to protect the cooker long-term.
The Rule I Use in My Kitchen
If I ever have to test whether I should replace the pressure cooker gasket— It’s already time.
Pressure cooking depends on elastic energy, not appearances.
Bottom Line
If you want consistent pressure, accurate timing, and long-term safety:
Replace your pressure cooker gasket when rebound fades—not when cracks appear.
It’s a small part, but it controls the entire system.
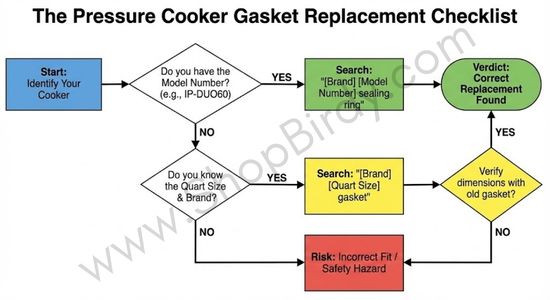
This flowchart guides the user through the critical steps of identifying their cooker's model number and brand, reinforcing the importance of getting an exact match to avoid safety hazards.
Legal Information
Shopbirdy.com is a participant in the Amazon Services LLC Associates Program, an affiliate advertising program designed to provide a means for sites to earn advertising fees by advertising and linking to Amazon.
Lily Clark has spent years testing cookware and kitchen appliances the way most people actually use them — on a home circuit, in a real kitchen, cooking real meals.
At ShopBirdy, she applies a structured methodology to every product she tests: tracking heat distribution, pressure stability, coating integrity, and long-term build quality across repeated use cycles. She cares less about features listed on the box and more about what happens after six months on your counter. Her reviews are written for people who want to buy once and cook well.