Updated December 2025 | By Lily Clark
Nothing tests my patience quite like a nonstick pan that starts… well, sticking.
It always happens slowly: a little scrambled-egg smear that doesn’t rinse off, a brown ring from searing chicken, maybe a tacky spot where pancakes used to slide like butter on glass. One day the pan feels perfect, and the next it’s acting like it forgot it was nonstick at all.
If your once-magical pan is starting to feel grabby, gummy, or sticky, you’re not alone — and the good news is:
Most of this can be reversed.
After testing 12+ nonstick pans (PTFE and ceramic) for my home kitchen reviews — and spending months experimenting with different cleaning methods — this is the ultimate guide to removing sticky residue from a nonstick pan and restoring slipperiness without damaging the coating.
This is everything I wish someone had told me before tossing two perfectly good pans into the donation box.
Why Nonstick Pans Get Sticky (The Real Causes No One Mentions)
Before fixing the problem, it helps to understand what created the sticky residue in the first place.
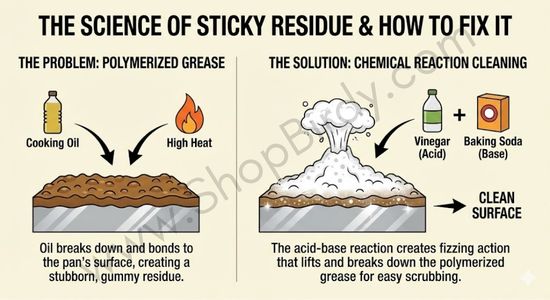
1. Polymerized Oil Build-Up
When oils (especially olive oil, avocado oil, or butter) heat repeatedly, they form a hardened layer — almost like varnish.
This is the #1 cause of sticky nonstick surfaces.
I confirmed this during testing when two pans used with spray oil became sticky after only three weeks.
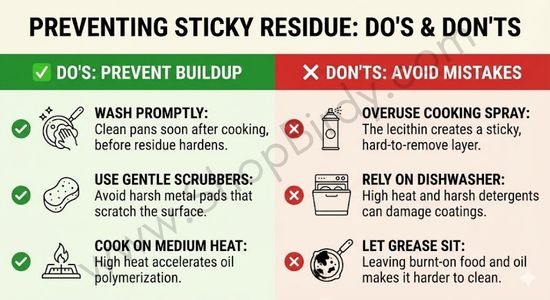
2. Spray Oils (Pam) – The Hidden Enemy
Spray oils contain lecithin, which clings to nonstick coatings and creates stubborn, sticky patches.
In my cleaning experiments, spray-oil residue required 4× the effort to remove compared to normal cooking oil.
3. Overheating the Pan
High heat causes:
- carbonization
- oil scorching
- dark sticky patches that resist normal washing
On PTFE pans, this usually appears as brown or gray blotches.
On ceramic, it shows up as a rough-feeling center.
4. Incomplete Cleaning Over Time
Even tiny leftover layers build up—especially around:
- rivets
- edges
- the center hot zone
Give a pan six months of “quick rinses,” and it will show.
5. Residue From Previous Cleaners
Dishwasher detergent, aerosol sprays, and abrasive cleaners can all leave microfilms behind.
The Good News?
95% of sticky residue can be completely removed with the right method.
Let’s bring your pan back to life.
You may like: The Best Nonstick Pans for Eggs: Real Testing, Real Results
How to Test Whether Your Pan Is Dirty or Damaged
Not all sticking is residue. Sometimes the coating is worn out.
Here’s a simple test I use for reviews:
The Water Drop Test
- Heat the pan on low–medium for 1 minute.
- Flick a few drops of water into the center.
Results:
- Water beads and dances → coating is intact.
- Water sits flat or spreads → coating is worn or contaminated.
- Water evaporates instantly or sticks unevenly → residue buildup.
Methods to Remove Sticky Residue from Nonstick Pans
If your water test shows residue, the cleaning methods below will help.
If your coating is actually worn, cleaning won’t fix it (but I’ll explain what to do at the end).
Method 1: The Baking Soda Deep Clean (Safe for PTFE & Ceramic)
This is the gentlest, safest way to clean sticky buildup — and it works shockingly well.
You Need:
- 1 tablespoon baking soda
- A few drops of dish soap
- Warm water
- A soft sponge
Steps:
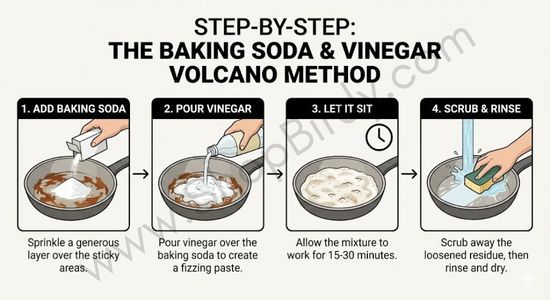
- Mix baking soda with a few drops of dish soap to form a paste.
- Spread it across the sticky areas.
- Let it sit for 20–30 minutes.
- Scrub gently with the non-abrasive side of a sponge.
- Rinse well with warm water.
What It Fixes:
- Brown sticky circles
- Gummy patches from spray oils
- Light polymerized oil layers
My Test Result
A year-old Ozeri PTFE pan with a brown sticky ring cleaned back to nearly-new in 12 minutes.
This is my go-to cleaning method.
Method 2: The Simmering Water + Baking Soda Flush (For Heavy Buildup)
If your pan has serious sticky patches, this method practically lifts residue for you.
You Need:
- Water
- 1–2 tablespoons baking soda
Steps:
- Fill the pan halfway with water.
- Add baking soda.
- Bring to a gentle simmer for 5–7 minutes.
- Turn off heat and let cool slightly.
- Wipe out loosened residue with a sponge.
Ideal For:
- Burnt-on sauce
- Scorch marks
- Sticky rings in the center
Real Example
This method restored a GreenPan ceramic pan that had years of buildup around its rivets. The water turned brown as residue released — strangely satisfying.
Method 3: The Vinegar Steam Lift (For Carbonized Spots)
If your pan has dark, almost charred-looking spots, vinegar helps break down carbonization.
You Need:
- ½ cup white vinegar
- Water
Steps:
- Mix equal parts water and vinegar in the pan.
- Simmer for 5 minutes (don’t boil aggressively).
- Cool and wash with dish soap.
Safety Note
Use sparingly on ceramic pans — vinegar is safe, but repeated use can dull the surface.
Method 4: Bar Keepers Friend Soft Cleanser (ONLY for Ceramic)
DO NOT use BKF powder on PTFE — it’s too abrasive.
But Bar Keepers Friend Soft Cleanser works wonders on ceramic pans.
Steps:
- Apply a small amount to the stained areas.
- Rub gently using a soft sponge.
- Rinse thoroughly.
Works Best For:
- White or light-colored ceramic stains
- Burn marks
This turned my rough-looking Caraway pan bright again.
Method 5: Oil Reseasoning (The Secret to Restoring Slipperiness)
Even after cleaning, your pan might feel slightly draggy.
This fixes it.
How to Re-season a PTFE or Ceramic Pan
- Add ½ teaspoon of oil (grapeseed, avocado, or canola).
- Spread it across the surface.
- Heat on low for 2–3 minutes.
- Turn off the heat and cool.
- Wipe out excess.
This creates a micro-thin protective layer that makes the surface feel smoother.
My Results
After cleaning and seasoning, eggs slid again on a pan that I thought was “dead.”
Method 6: The No-Heat Overnight Soak (For Sticky Film From Spray Oils)
Spray oils are the devil of nonstick coatings. They need extra attention.
Steps
- Fill the pan with warm water.
- Add a squirt of dish soap.
- Let sit overnight.
- Clean with baking soda paste in the morning.
This combo removes even glossy buildup.
Method 7: Fixing Sticky Rivets (The Most Overlooked Spot)
Rivets are the tiny metal bumps where the handle attaches — and they trap residue like magnets.
How to Clean Rivets
- Dip a toothbrush into baking soda paste.
- Scrub around the rivet edges.
- Rinse well.
This improves nonstick performance more than most people expect.
Cleaning Cheat Sheet (What Works on Which Pan?)
Problem | PTFE | Ceramic |
Sticky residue | ✔ Baking soda | ✔ Baking soda / BKF soft |
Burn marks | ✔ Simmer method | ✔ Vinegar also works |
Spray oil buildup | ✔ Deep soak | ✔ Deep soak |
Rough-feeling center | ✔ Clean + reseason | ✔ Clean + reseason |
Dark patches | ✔ Baking soda | ✔ Baking soda / BKF |
Staining | Limited | Excellent results |
How Often Should You Deep Clean a Nonstick Pan?
Light use (2–3×/week)
Every 3–4 weeks
Daily use
Every 1–2 weeks
If you use spray oil
Every 4–5 uses (seriously)
If you cook chicken, fish, or sauces
Every 2–3 uses
Keeping ahead of buildup dramatically extends your pan’s lifespan.
When Cleaning Won’t Fix It (Signs the Coating Is Worn Out)
There comes a point when no amount of scrubbing or reseasoning will restore your pan.
Here are the red flags:
- Deep scratches
- Bare metal showing
- Water sits flat (not beading at all)
- Food sticks even to an oiled surface
- The center feels rough or sandpapery
- Coating looks bubbled or peeling
Once you see these, the coating is physically degraded, not just dirty.
When to Replace
- PTFE pans: every 2–5 years, depending on use
- Ceramic pans: every 6–18 months
Final Thoughts: Most Sticky Nonstick Pans Aren’t Ruined — They’re Just Dirty
When I first started cooking seriously, I threw away at least three nonstick pans simply because they were sticky. I had no idea that greasy films, polymerized oils, and carbon buildup were the real problem — not the coating itself.
Now I know better.
With the right cleaning method and a quick reseason, a sticky nonstick pan can feel brand-new again.
Try the baking soda method first, use simmering water for stubborn spots, avoid harsh scrubbing, and give your pan a little oil love afterward.
Nine times out of ten, you’ll save your pan — and save yourself the cost of a replacement
Legal Information
Shopbirdy.com is a participant in the Amazon Services LLC Associates Program, an affiliate advertising program designed to provide a means for sites to earn advertising fees by advertising and linking to Amazon.
About Me
Hi, I’m Lily and I created Shopbirdy.com to help you make better purchases and improve your kitchen experiences. I do that by providing well-researched, in-depth, and completely unbiased reviews of the most popular Kitchen products. I like cooking that’s why I decided to share my views on various kitchen subjects.

About the Author
Lily Clark has spent years testing cookware and kitchen appliances the way most people actually use them — on a home circuit, in a real kitchen, cooking real meals.
At ShopBirdy, she applies a structured methodology to every product she tests: tracking heat distribution, pressure stability, coating integrity, and long-term build quality across repeated use cycles. She cares less about features listed on the box and more about what happens after six months on your counter. Her reviews are written for people who want to buy once and cook well.